
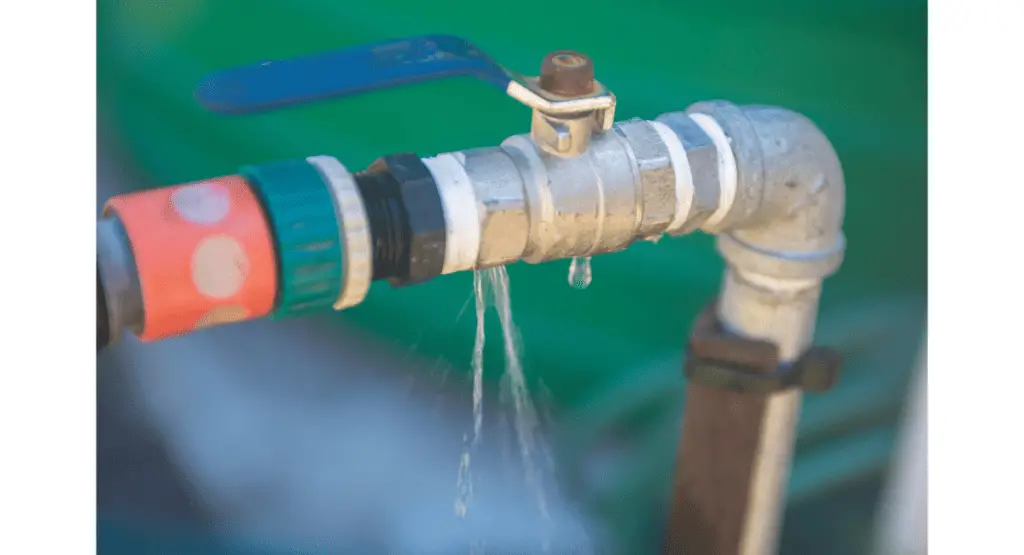
Quick Steps to Detect and Fix a Garden Hose Quick Connect Leaking Issue
Experiencing a water leak in your garden hose can be frustrating. A common cause of such leaks often involves the quick connect of the hose. The quick connector, which is essentially a device that links your hose to various attachments, may leak to some degree due to wear and tear or other issues. Detecting and fixing a quick connect leaking issue doesn’t have to be a complex task. Here’s a quick guide on how to handle your garden hose quick-connect o-ring.
The quick connects on your garden hose serve a vital function. They allow a speedy transition between different attachments such as spray nozzles, sprinkler systems, and various other watering equipment. If these connectors start leaking, water wastage can occur, and the efficiency of your watering tasks is substantially reduced.
- Initially, to fix a quick connect leaking problem, it’s vital to confirm the quick connect is genuinely the source of the leak. To confirm, remove any attachments and monitor your hose. If water continues to leak from the quick connect area – you’ve found the culprit. However, if the hose leaks elsewhere – you might need a different repair method for your hose.
- Once you’ve determined that your quick connect is indeed the problem, you can move onto the repair phase. An effective way of addressing the issue is by replacing the quick-connect o-ring. The o-ring is primarily responsible for forming a seal when the connectors are engaged. As such, a faulty o-ring is a likely reason behind the leak. You’ll need to gently remove the old, damaged o-ring and replace it with a new one. Taking care to ensure it’s correctly placed to prevent further leaks.
- After replacing the quick-connect o-ring, give your hose another test. With the water running, observe your hose to detect any signs of a persistent leak. If the leaking has stopped – great! You’ve successfully repaired your garden hose quick connect. In case of continued leaks, you might need to investigate other culprits or consider a hose replacement.
Dealing with leaks can be a bit of a hassle, but with these quick steps, handling a garden hose quick connect leaking issue becomes a simpler and far less daunting task. Armed with the right knowledge and tools, you can swiftly get back to keeping your garden lush and healthy.
Top garden hose connectors to avoid leaks.
Identifying the Garden Hose Connection Leak: Causes and Fixes
Dealing with a leak in the coupling of your garden hose quick-connect can be a real hassle. Especially when you can’t identify where the leak is coming from. This might be one of the most common issues with garden hoses, but the good news is, leaks can be fixed swiftly once you’ve identified the cause.
Garden hose connections can develop leaks due to many reasons. One such cause can be poor connections as a result of mineral buildup or gasket degradation. Minerals from water can start accumulating around your hose connection, and over time, this buildup can lead to potential leaks.
Addressing a leaking coupling involves first turning off the water supply to curb possible water wastage. When you notice a leak, do not rush to conclusions, or attempt immediate fixes. Understand the problem – is it a single leak or multiple leaks? Secondly, try to locate exactly where the leak is and whether it’s from the hose itself or the quick-connect.
- Once you’ve identified the leak source, odds are it’s either due to poor attachment of the garden hose or due to gasket degradation within the hose coupling. Poor connections in hose garden attachments may cause water to leak out. However, this can be sorted out by firmly tightening the hose connection.
- In cases where you have mineral buildup causing the hose to leak, you’d want to disconnect the garden hose, then clean it out using a mixture of vinegar or any standard cleansing solvent. This helps dissolve the minerals causing the leak.
- Another common cause of leaks is a degraded gasket within the quick-connect. Gaskets within your hose connection can degrade over time, eventually causing the hose to leak water. If you discover that it’s a degraded gasket causing the leak, then simply replacing the gasket will solve the issue.
No one enjoys a leaking garden hose, but with these quick fixes, you can stop that water leak quickly. By understanding the causes, you can work to prevent future leaks and help your hose last longer. Just remember, it’s more than water – it’s peace of mind in your gardening tasks.
How do hose quick connects work?
Understanding the Role of Tubing and Fittings in a Leaking Hose Connection
In dealing with a garden hose quick connect leaking issue, understanding the role of tubing and fittings becomes extremely crucial. When you notice water leaking from your hose connection, it’s often due to incorrect or improper hose fittings. These fittings are an integral part of your garden hose, and if they are not attached in the right manner, it can lead to leakages. This is because these fittings act as a seal between your hose and the water source. So when these were installed improperly, the seal is compromised leading to leaks.
- One common type of fitting that is used is the brass fitting. Brass is a sturdy material that is resilient against corrosion, hence, making it ideal for constant contact with water. However, despite their strong nature, even brass fittings can get worn out over time or, if improperly installed, can cause issues with leaks. As such, when dealing with a garden hose quick connect leaking problem, it’s always a good idea to inspect the state of these brass fittings. Provided they are in good condition, and ensuring a secure connection can often sort out the issue.
- Another thing to pay attention to is the tubing. Tubing, like fittings, plays a significant role in the proper functioning of your garden hoses. Specifically, a tubing quick-connect ensures a secure link-up between your garden hose and its source of water. These quick-connect systems reduce the time spent screwing and unscrewing the hose to the spigot, a task that can be demanding and tiresome. However, if the tubing quick-connect is worn out, cracked, or is merely the wrong size for your hose, it could lead to a garden hose quick connect leaking problem.
- Finally, always remember that the right selection and usage of tubing and fittings are crucial to your hose connection. Water, in this context, is not just a utility but your enemy if leaks start to appear. So always make sure your fittings – whether it be a hose, the tubing, or the brass fixtures – are in good condition and correctly fixed to stop unnecessary water leaks from your garden hose.
How to Properly Connect and Secure Fitments to Prevent Water Leaks
Water leaks from garden hoses can be a common nuisance, often attributed to improper connections or unsecured fitments. Learning how to connect and secure these can help prevent water waste, enabling you to enjoy a leak-free watering experience. The essential components for doing so include connectors, a fitting, a valve, and of course, the garden hose itself.
Initially, ensure that your garden hose has an integrated quick connect system. This system allows for easy and efficient hook-up to any faucet or hose accessory, serving as a key element in leak prevention. The quick connect feature aims to make your garden watering tasks hassle-free by promoting smooth and straightforward connections, while reducing the chances of water leakage.
To secure a proper connection, begin by affixing the hose to the tap. As you connect, take care to attach the fitting securely. This process involves connecting the hose and faucet with a twisting movement until they’re tightly fitted together, thus helping prevent water leaks. You’ll need to connect and confirm the fixture of both ends of the hose to their respective connectors – this is vital to halt any potential leaks.
Following this, the importance of appropriately securing fitments comes into play. It would be a mistake to underestimate the crucial role that fitments play in a leak-free hose function. A secure connect with the fitments on both ends ensures that no unwanted water escapes.
Moving forward, don’t overlook the role of the valve in the process. The valve controls the water passage. Regulate it properly, and the odds of dealing with a leaking hose diminish significantly. Make sure you connect it correctly to avoid encouraging any possible leaks.
Do remember that a well-integrated quick connect system is fundamental to an efficient and leak-free garden hose. It’s equally important to remember that the goal of every connect made during the process is preventing leaks. Approaching fittings, connectors, and valves with accuracy and patience can result in establishing a secure watering system.
Finally, understanding the roles of different parts in this network will equip you to better handle a garden hose quick connect leaking problem in the future. In conclusion, water leaks can be swiftly and effectively managed by properly connecting and securing fitments, making your watering tasks enjoyable and worry-free.
Quick Tips on Reducing and Eliminating Quick Connect Water Leaks
If you’re dealing with a garden hose quick connect leaking, don’t panic. There are quick, easy solutions for reducing leaks and even eliminating leaks altogether. Firstly, always ensure your connect is secure. A loose connect could be a simple reason for water leaks. Similarly, damaged connects could contribute to the problem. It’s always a good idea to regularly check your connects to ensure they’re in good shape and holding tight.
Next, paying attention to your hose is vital in avoiding leaks. A leak could spring from a slit or hole in the hose. Check your hose thoroughly for any signs of damage. Supposing there’s a leak, you could either patch it up or decide to replace the entire hose. Remember, reducing leaks is all about prevention, so don’t hold off on replacements when necessary.
Moving on, let’s consider water leaks from other parts of the hose. Water from your hose may be escaping due to a faulty nozzle. A well-functioning nozzle should stream out water evenly when you turn on the hose. However, if you observe that water is leaking around the base of the nozzle or from the handle, it’s a clear sign that your nozzle is the culprit. Again, opting for a high-quality replacement is a smart decision.
Additionally, water leaks could also occur at the end of your hose or the point of connection with your spigot. Carefully inspect the end of your hose where it connects to the spigot. If you find that it’s loose, tighten it up. If the end of the hose or the connecting component is worn out, it may be time for a new one. Don’t forget, eliminating leaks is the ultimate goal.
A final point to note for handling a garden hose quick connect leaking situation is the importance of quality parts. Whether we’re talking about the hose, the connects, or the nozzle, quality matters. Going for more robust varieties may cost more upfront, but it’ll save a lot in the long run in reducing leaks and water waste. So, remember the value of quality when you’re out to tackle your garden hose quick connect water leaks.
Share Your Comments Regarding Best Practices for Addressing Hose Leaks
Water leaks can be a pesky problem, especially when it comes to garden hose leaks. Whether you’re in Santa Ana, or anywhere else in the world, water is a precious commodity that should not be wasted. If you’ve noticed a leak, addressing hose leaks promptly and efficiently is crucial. Some of the best practices to manage such a predicament are pretty straightforward.
The first thing you should do is to turn off the water source. Do not underestimate the pressure the water exerts on your hose walls and fittings. This pressure can make the leak worse. Ensuring the water source is off gives you the opportune time without the pressure to properly diagnose the problem.
You need to inspect your garden hose to determine the end where the leak is. The end could also be the wall or the hose’s other section. Hose leaks can occur on any side, especially if the fittings are loose. The best way to test this is to turn on the water briefly.
If the fittings are loose, the best practice to stop the leak is to tighten them. But, ensure you don’t overtighten as it might provoke more leaks or even damage the hose. If this does not stop the leak, try replacing the product. Sometimes the product, the garden hose itself, or its fittings might be at fault.
When replacing a hose, be sure to look out for leak-proof or leak resistant products. Be it an RV hose for camping trips, or your everyday garden hose for gardening, a leak-proof product is a sound investment. It saves you from the hassle of regularly addressing hose leaks.
If the leak is not on the end of the hose, but on the wall or in the garden hose itself, the best repair practice would be to cut the hose at the leak, put a joiner on it, and connect the two ends. We would love to hear your experiences about addressing hose leaks, any tips you might have, or products you recommend. Please share your comments about this topic in this end, as understanding from your personal experiences can help educate and guide others facing similar hassle with hose leaks.
